Tuesday, December 11, 2012

tomato soup

Ah, what better dish to make on a cold day, after a weekend of being sick... meaning no new and fresh groceries are in the house?  Tomato soup.  Simple, yet satisfying when eaten with some good bread and cheese.

This recipe was passed along to me by a friend and it's a delicious take on tomato soup.  It has a hint of sweetness from the balsamic vinegar and although it is pureed, it still has the right amount of texture and isn't overly smooth.


tomato soup

Ingredients
3 cloves minced garlic
1 small onion, chopped
2 T olive oil
1/4 c. dry white wine (optional)
1 15 oz. can fire roasted tomatoes (or plain tomatoes are fine too)
1 12 oz. jar roasted red peppers, drained and chopped *
2 c. chicken broth
1/2 c. packed fresh basil, roughly chopped (or a couple large spoonfuls of pesto)
1 T. balsamic vinegar
2 tsp sugar
1/4 c. plain yogurt
freshly ground black pepper to taste

Cheese bread
slices of whole wheat baguette
olive oil
garlic or onion powder
freshly ground black pepper
cheese of your choice (parmesan, goat cheese, feta) ... I used goat cheese

Instructions
Preheat oven to 400 (for the bread).
Saute garlic and onion with olive oil in a large pot over medium heat for a few minutes.  Add white wine, if using, and cook for a few more minutes, or until most of the wine has absorbed.  Add the tomatoes, red peppers, and chicken broth.  Simmer for 15 minutes.

While the soup is simmering, drizzle slices of bread with olive oil, sprinkle with garlic or onion powder, freshly ground black pepper, and cheese.  Bake at 400 for about 10 minutes, or until the bread is golden and the edges are crusty.

While the bread bakes, remove the soup from heat and add the basil, balsamic vinegar, and sugar.  Stir until combined.  Puree the soup with a hand immersion blender, (If you don't have one of these I highly recommend owning one.  They are fairly inexpensive and are great for smoothies, dressings, soups, etc.  It's easier than getting out the blender.) blender, or food processor.  If using a blender or food processor, you might have to puree the soup in a couple batches, depending on the size of your device.  You may also want to let the soup cool a little before handling.

After pureeing the soup, return to a low simmer and add the yogurt and black pepper.  Stir until combined and serve!

Serves 2-3.


* the jar of roasted red peppers I used also had some artichokes and eggplant in it...  the soup is good either way!

Friday, November 30, 2012

salmon dip

I love salmon, just not as much when I'm pregnant.  Knowing that it's good for me and still wanting to eat it, I created this dish which makes salmon a little more "pregnant friendly"... by adding cheese and eating it with carbs! 

The banana peppers are a little bit of a unique ingredient, but add a nice tangy contrast to the salmon and cheese.  When I made this we ate it warm out of the oven with crackers, but I found out the leftovers are good cold as well.


salmon cheese dip

Ingredients
6 oz. can of salmon (the higher the quality the better.. aka, wild Alaskan or sockeye salmon)
2 oz. softened cream cheese
1/2 c. plain greek yogurt
1/4 c. mayo
1/4 c. chopped banana peppers
2-3 T. finely chopped red onion
1 clove minced garlic
juice from 1/2 a lemon (~ 2 T.)
1/4 tsp paprika
1/4 tsp garlic salt
1/4 tsp dried dill (optional)
pepper to taste

Instructions
Combine the cream cheese, yogurt, and mayo.  Stir until combined and smooth (if the cream cheese is a little chunky it's fine since it will be baked).  Add the remaining ingredients and mix together.
Spread dip in a 8x8 pan, or other small baking dish, and bake at 375 for 20-25 minutes, or until the edges are brown and the dip is heated through.

Enjoy with crackers, toasted bread, or on a sandwich or wrap.

Serves 6-8.


Tuesday, November 20, 2012

spicy mushroom bruschetta

We were having our Aunt and Uncle over for our son's birthday party, and I needed a fun appetizer.  Nothing too heavy, something on bread sounded good.  Cooking Light is one of the websites I frequently use when needing a tasty recipe that's going to be on the light side.  And it didn't disappoint. I found a recipe for spicy mushroom bruschetta that was delicious.

I made a few substitutions based on ingredients I had/didn't have:

  • 1/2 tsp ground cumin instead of cumin seeds
  • no fenugreek leaves (which I read could be substituted with maple syrup but I didn't use anything because I didn't want a sweet flavor)
  • a sprinkle of crushed red pepper flakes instead of a red chile
  • no garam masala
Since it had jalapeno and crushed red pepper flakes in it, it was pretty spicy overall.  Not make your nose water spicy, but too spicy to give a little kid, in my opinion...

spicy mushroom bruschetta
... find the recipe here

Tuesday, November 13, 2012

cilantro lime carrots

While mulling over what to do with the rest of the huge bag of carrots I had boughten from Costco, I came across this recipe that I had pinned to Pinterest and forgotten all about (something that happens to me far too often).

I'm a little picky with how I like my carrots cooked... not one that likes those cheesy carrots coated in bread crumbs, hardly able to still be called a vegetable.  These seemed like quite the opposite - light and tangy from the lime and cilantro.

I pretty much followed the recipe to a tee - just used cilantro instead of mint and green onion, as I didn't have either of those.  But I liked how the cilantro went with the lime and cumin better than I would have liked mint, so it turned out to be a good switch.  Overall they were very tasty and would definitely make them again.

cilantro lime roasted carrots

Ingredients
6 large carrots, peeled and cut into strips
1 T olive oil
juice and zest from 1 lime
1 tsp honey or agave
1/2 tsp cumin
1/4 tsp coriander
1/4 tsp paprika
1/4 c. chopped cilantro
salt & pepper to taste

Instructions
Combine carrot strips with remaining ingredients and stir until combined (I used just 1/2 of the lime before they cooked and 1/2 after).  Spread on a baking sheet and bake at 400 for 15-20 minutes, or until  tender crisp.
Squeeze other 1/2 of lime over carrots and drizzle with a little more olive oil if needed (mine were a little dry after coming out of the oven).  Garnish with a fresh cilantro if desired.

Serves 3-4.

Tuesday, October 30, 2012

mushroom pizza with arugula

So I've been a little absent these last couple weeks.  Our fam was in AZ visiting friends.. and eating lots of good food.  I didn't snap pics of most of it (I think I'm always too excited to just dig in - forget the camera!)... but did take this one of some delicious sea bass pad thai tacos at Sapporo (which were super delicious):


Another great place to eat in the Phoenix, AZ area is Postino's, should you ever be out that direction.  It has all different kinds of bruschetta... a big hit for a couple pregnant ladies! :)  (yes, both myself and the friend I was visiting are preggo... and due on the same day!)

So back to mushroom pizza, perhaps my very favorite kind... as long as it includes parmesan cheese.  My other favorite way to eat pizza is with a little lightly dressed arugula or mixed greens on the top - it freshens up the pizza and helps you get another serving of those oh so important veggies.

mushroom pizza with arugula salad
Ingredients
1 whole wheat pizza crust (find my homemade pizza recipe here)
1 package sliced portobello mushrooms
1/2 c. parmesan cheese (or more)
1/4 c. feta cheese (or more)
2-3 cups arugula
olive oil
freshly squeezed lemon
balsamic vinegar
pine nuts (optional)

Instructions
Preheat oven to 400.  Roll out pizza dough into desired thickness.  Brush with a thin layer of olive oil and sprinkle with parmesan cheese.  Bake at 400 for about 10 minutes,  or until it starts to turn golden brown.
While the crust bakes, saute mushrooms in 1-2 tsp olive oil and a little salt & pepper until they are tender.  Drizzle with balsamic vinegar (about 1 T).  Set aside.
Once crust is finished, top with mushrooms and feta.  Bake for another 5-10 minutes, until crust is desired crispness.
To make the arugula salad, simply drizzle the arugula with a little olive oil, lemon juice, balsamic vinegar, sprinkle with salt & pepper, and toss until combined.  Go a little light on everything, as you can always add more.
Serve pizza with arugula salad and sprinkle with a few pine nuts, if desired (I did eat mine with pine nuts, but added them after the picture was snapped and I'd already devoured about 1/2 of it :)).

Tuesday, October 16, 2012

lentil soup

I love soup.  Making it.  Eating it.  And I rarely get sick of leftover soup... it tastes so good for several days after you make it.

Soup is a way to be creative... all food is, really.  But taking what you have on hand and putting it into a pot and having a tasty outcome... that's just satisfying.

Any kind of lentil, bean, pea soup is my absolute favorite.  So when I remembered I had some lentils in the pantry for lentil soup, I was excited.

And it did not disappoint.  I had it for lunch today and wished I could have ate three bowls (the only downfall of soup... it fills you up fast!).  I've said this before, but I love eating bean and lentil soups with hot sauce and vinegar.  Yes vinegar, plain white vinegar.  Odd huh?  But for some reason it is so good.  That's just how I ate mine, and it was delicious.

lentil soup
Ingredients
2 c. + chicken broth
1 c. dried lentils (I just used the regular brownish looking ones)
1 can (11.5 oz) v8 tomato juice
1 small onion, diced
2 carrots, peeled and finely chopped (or about 10 baby carrots)
2-3 bay leaves
1 tomato, chopped
1/4 tsp garlic salt
1/4 tsp paprika
1/4 tsp curry powder
1/4 tsp turmeric
1/8 tsp celery salt
pepper

Instructions
Saute carrots, onion, and spices in olive oil for a few minutes until the veggies are just starting to get tender.  Add the lentils, 2 c. chicken broth, tomato juice, and bay leaves.  Cover and simmer at least 30 minutes, or until lentils are tender, adding more broth as needed.  I ended up simmering mine for 45 minutes - hour.  Add the tomato and simmer a few more minutes until it is tender.

Serves 3-4.

Wednesday, October 10, 2012

sweet potatoes... and a really good sauce

I found a recipe online for a yummy looking sauce to go with sweet potatoes.  Aftter a few modifications, we enjoyed it with roasted sweet potatoes for dinner.  The sauce is spicy and tangy, a fun contrast to the starchy sweet potatoes.
I have put the leftover sauce in a quesadilla and drizzled it over tortilla soup - both were delicious.  Eating it with fish tacos or even as a dressing on a salad would be good too.  There are many, many options for using up the sauce.

roasted sweet potatoes with cilantro.jalapeno.yogurt sauce
Ingredients
Potatoes
sweet potatoes
olive oil
garlic salt
paprika
pepper

Yogurt Sauce
1 c. plain greek yogurt
1 c. cilantro, roughly chopped (used both the stems and leaves)
2 jalapenos, seeded and chopped (this made it pretty spicy - would want to use 1 pepper or less if you don't like very spicy food)
juice of 1 lime
1/2 tsp. garlic salt
pepper

Instructions
Preheat oven to 400.  Wash sweet potatoes and cut into cubes.  I didn't peel mine because the skin was thin, but if the skin is thick I would peel them.  Put potato cubes on a pan, drizzle generously with olive oil, and sprinkle with seasonings.  Stir until potatoes are evenly coated with oil and seasonings.  Bake for 20-30 minutes, or until they are fork tender, stirring once after 10-15 minutes.  If the potatoes seem too dry or stuck to the pan when stirring, add more olive oil.  Sprinkle with more salt & pepper if needed after baking.

To make the sauce, combine all ingredients in a food processor and pulse until smooth.  Taste and adjust seasonings as needed.  If too spicy, add more yogurt (or you could sub some sour cream).

Friday, October 5, 2012

sushi bowls

Sushi bowls.  The cheaper and faster way to satisfy your craving for sushi.  I've been wanting to make these for a while and finally got around to it.  They really are easy, the main time committment is just chopping the veggies and making sure you start the rice early enough for it to cool to room temp.

I had shrimp on hand, so that's what we used, but these would be great with any meat that's used in sushi - raw or cooked.  And the veggie options are endless.  Even a little mango would be good in them.  Be creative! 

I used these little square roasted seaweed sheets for the salad (got mind at Costco, but I've seen them at TJ's as well).  I cut them in half and then snipped them into little strips.
    
all the toppings just waiting for their rice and shrimp - seaweed strips, carrots (cut into strips with a peeler), cilantro/green onion/jalapeno, shitake mushrooms, cucumbers, avocado

 
sushi bowl
 Ingredients
sushi rice
meat - crab, shrimp, raw tuna or salmon, etc.
veggies
seaweed wrappers
sesame seeds
soy sauce
ginger (the kind you get with your sushi at a restaurant)

Instructions
To make sushi rice, rinse your sushi rice with water (sometimes I forget this step and it's still fine.. just a little stickier) and combine equal parts sushi rice to water (i.e. 1 c. rice, 1 c. water... although sometimes I need to add a little more water) in a large saucepan and stir with a spatula.  Bring to a boil.  Reduce heat to a simmer, stir again with a spatula and cover with foil.  Cook for 15-20 minutes or until water is absorbed and rice is cooked (check after about 10 - 15 minutes and see if it needs more water).  Remove from heat and add seasoned rice vinegar (usually it will say on the bottle how much vinegar you need, if it doesn't then add 1-2 T. for every cup of dry rice).  Let rice cool to room temp.

To build your bowl, simply layer rice, sushi meat, veggies, seaweed strips in a bowl.  Sprinkle with sesame seeds and drizzle with soy sauce.  I also ate mine with some pieces of ginger.  Light and delicious!


Tuesday, October 2, 2012

apples

The other day (or week) a couple friends and I took our kiddos to an orchard to pick apples, followed by making applesauce at my friend's house... a great fall experience!  We also got apples for apple butter, which was something new for me to make.

Overall making both applesauce and apple butter is very easy.  I made my applesauce chunky and cooked it over the stove.  The apple butter I made in a crockpot.  I decided to freeze both, so I didn't need to can anything (which seems like a complicated process to me).

the little guy helping me pick apples :)

applesauce and apple butter
 Applesauce:
1 large soup pot full apples
several cups of water (or sub some water with apple cider)
cinnamon

Instructions:
Peel, core, and cut up apples into chunks.  You can use whatever kind of apples you'd like.  I used mostly Golden Delicious with some Jonathan, a more tart apple, and it was sweet enough that I didn't need to add any sugar.  If you like sweeter applesauce, or use mostly tart apples, you might need to add some sugar.
Put apples in a large pot and add a cup or two of water or juice.  Cover and cook over medium low, stirring often and adding more water/juice as needed, depending on the consistency you want.  Cook until the applesauce is as smooth as you would like it.  If you have a big pot, it may take an hour or two to cook, but a smaller pot may only take 30 minutes to an hour.  Stir in some cinnamon until you like the flavor.
Put in quart ziploc bags, or freezer safe containers, to freeze.


Apple butter:
1 large crockpot of tart apples (I used Ida Red)
1/2 c. water or apple cidar
1/4 c. brown sugar
2 T. honey
sprinkle of cinnamon
a little nutmeg and ginger
1 tsp vanilla
lemon or orange zest (optional)

Instructions:
Peel, core, and cut up apples into chunks.  Place in crock pot and add liquid, sugar, and spices (you can always go light on the sugar and spices and add more at end).  The apple butter needs to cook on low overnight.  I started mine on high for a couple hours (making sure to stir it so the apples on the bottom don't stick), and then turned it down to low before I went to bed.  When I got up I cooked the apple butter for a little longer without the lid, and it was done cooking.  If you only cook it on low, I think it will need more like 10-12 hours on low, instead of 8-9.
Once the apples are cooked down, you can either leave it a chunky consistency, or puree it.  I opted to puree it with my hand blender.  Before pureeing, add the vanilla and zest.  Puree until smooth.  Taste and add more sugar/spices if needed.
Put in jars to freeze.

Friday, September 28, 2012

make ahead lunch: quinoa salad

Quinoa.  It is quite the versatile food.  It can be eaten warm or cold, as a main dish or a side, it can be sweet or savory...

I think one of my favorite things about quinoa is that it eats like a grain, but isn't.  It is actually a seed... one that is full of protein and lots of other good things.  Last night for dinner I made quinoa as a sub for rice to go with our shrimp stir-fry, and used the leftovers to make a quinoa salad today.

Quinoa salad is super easy to make.  I always just use whatever herbs/veggies/cheese/meat/nuts I have on hand, toss it with a little olive oil & citrus or salad dressing, and the quinoa salad is complete.  Another great thing is that it lasts for several days in the fridge and the quinoa's texture doesn't change... like when pasta salad gets kind of soggy and the noodles fall apart after a few days.

tomato.spinach quinoa salad

Ingredients:
2 c. cooked quinoa
1 c. halved grape tomatoes
1 c. finely chopped fresh spinach
1/2 c. cooked chicken or turkey, cubed
1/3 c. shredded parmesan
2-4 T. olive oil
1/2 lemon, juiced
1/4 tsp garlic salt
1/4 tsp paprika
1/4 tsp coriander
pepper to taste

Instructions:
Combine the quinoa, tomatoes, spinach, meat, and parmesan.  Stir until combined.  Sprinkle with seasonings and lemon juice.  Drizzle with 2 T. olive oil and stir together.  Taste and add more olive oil, salt & pepper until satisfied.

You can enjoy this salad right away, or refrigerate before eating.

Serves 2-4.


Other quinoa salad ideas (using a dressing/citrus that pairs with the salad):
mexican - black beans, corn, tomatoes, cilantro, cumin, lime, avocado (wouldn't keep as long with avocado)
mediterranean - sun-dried tomatoes, olives, fresh spinach, artichokes, pine nuts, basil, feta
cobb - bacon, tomatoes, corn, avocado, arugula, blue cheese, chopped walnuts
greek - chick peas, cucumber, tomatoes, peppers, feta, oregano
fruity - dried cranberries, apples, blueberries, chopped almonds, fresh parsley
asian - carrots, edamame, shredded cabbage, snap peas, cilantro, lime, chopped peanuts
random - roasted beets, goat cheese, orange segments, green onion, chopped walnuts


purchasing side note:  If you live by a Costco, I would recommend buying your quinoa there, as you can get a big bag for $10.  Otherwise, grocery stores like Whole Foods sell it in bulk, or ones like Kroger would have it in their health food section.

Monday, September 24, 2012

granola

I go through phases of making homemade granola.  My last phase was a long time ago, so another batch of granola was overdue.  It's not hard at all - super fast and much cheaper than store bought granola... it's just remembering to take the time to make it. :)

I like this recipe because it isn't overly sweet and doesn't have much oil.  It has just enough flavor and crunch to make it tasty.  My version below is pretty basic - just oats and and almonds, but dried fruit or coconut would be great additions (I would probably add the dried fruit after baking).

maple almond granola
Ingredients:
4 c. oats
1/4 c. sliced almonds
2 T. ground flaxseed (optional)
2 tsp cinnamon
1/2 tsp salt
1/3 c. water
1/3 c. real maple syrup
1 generous T. canola oil
2 T. brown sugar
2 tsp vanilla

Instructions:
Combine the oats, almonds, flaxseed, cinnamon, and salt in a bowl and set aside.

In a small saucepan, stir together the water, syrup, oil, and brown sugar.  Bring to a boil and remove from heat.  Stir in the vanilla.  Pour over the oat mixture and stir until combined.  Spread onto a greased jelly roll sheet and bake at 325 for 35 minutes, stirring every 15 minutes (bake for a few more minutes after stirring the second time).

Enjoy over yogurt, ice-cream, as cereal, on top of cooked fruit as a "mock" fruit crisp... so many possibilities!


Tuesday, September 18, 2012

risotto

I always used to think that risotto was this rich, overly creamy and cheesy dish, just by the looks of it.  While it does have some cheese in it, the creaminess is merely from the type of rice and the cooking method, not actual cream at all, making it much lighter than I thought it was. 

There are many different types of risotto you can make, but I love it with a little white wine, mushrooms, and parmesan cheese - the combination is delicious.  My little 22 mo. old loved it and even ate the mushrooms!

Risotto can also get the rep of being a high maintenance and complicated dish, but it's really not bad.  As long as you are in the kitchen and can stir it while it cooks, it's easy to multi-task and do other things while making it.

mushroom, spinach risotto
Ingredients:
2 1/2 c. chicken broth (or you can sub a little water for some of the broth)
1/2 c. aborio rice
1/4 c. dry white wine
1/2 small onion, finely chopped
1 clove minced garlic
1 small container sliced mushrooms
1 c. chopped fresh spinach
1/3 c. shredded parmesan
salt & pepper to taste

Instructions:
Pour the broth into a saucepan and bring to a simmer.  Keep on a low simmer or warm while making the risotto.

In another pan, saute the mushrooms with a little olive oil and salt and pepper until they are tender.

While the broth warms and mushrooms cook, saute the onions and and garlic in a little olive oil over medium heat unil the onions are just becoming tender, about 3-5 minutes.  Add the aborio rice and saute a couple more minutes, or until the rice starts to lightly brown.  Stir in the white wine and cook until it is absorbed.  Turn the heat down to a little, just high enough that the broth simmers when it is added.  Add 1/2 c. warmed chicken broth to the rice, stir, and let cook until the broth is absorbed, stiring a couple more times while it cooks.  Repeat this process until all but 1/2 c. broth remains.  Add the spinach, cooked mushrooms, and parmesan cheese and stir until cheese is melted.  Add the remaining broth and stir until combined.  Taste and add more cheese, salt, and pepper if needed.  Sprinkle with a little more parmesan cheese before serving, if desired.

Serves 3-4.

Tuesday, September 4, 2012

tomato cucumber salad

After being with family on labor day and receiving a big bag of tomatoes, cucumbers, onions, and peppers fresh from the garden, I knew Exactly what I wanted to make with it.  Tomato cucumber salad.    Or at least that's what my family calls it.

It's one of those foods that I think of when I think of summer.  A bowl full of fresh produce from the garden, with a light, zesty dressing.  It's so delicious.  And so light and refreshing that I can eat massive amounts of this salad without a problem.  The minute I finished making this salad I had to have a bowl.  And then another.  I think it's the tomatoes that make it so amazing.  There is nothing better than tomatoes fresh from the garden.  I think I can definitely call them my favorite food.  For sure.

tomato cucumber salad

Ingredients:

Dressing:
1/4 c. canola oil
3 T. vinegar
2 T. sugar
2 cloves minced garlic
2 tsp. dried oregano
1 tsp. salt (or 1/2 salt + 1/2 celery salt)
1/2 tsp. dry mustard
1/2 tsp. paprika
1/2 tsp. celery seed or celery salt (substitute 1/2 of regular salt with celery salt)
1/2 tsp. garlic powder
freshly ground black pepper to taste

Salad:
2 large or 4 small cucumbers, cubed (might want to seed if the seeds are really large)
4-5 large or lots of small tomatoes, seeded and chopped
1 yellow or orange pepper, chopped
1 small onion, finely chopped
1 can black olives, drained and cut in half (optional)
crumbled feta (optional)

Instructions:
Mix all dressing ingredients in a large bowl and whisk until combined.  Cut up all veggies and add to the dressing.  Stir until combined.  Taste and add more salt if needed.  If using feta, add right before serving.  The "traditional" salad I grew up eating did not have feta, nor does the one picture as I didn't have any, but it is a good addition.  Refrigerate 1-2 hours before serving.  Serves 6-8 (normal people... If they all eat as much as I do, maybe 4 :)).

I always just make the dressing in a large bowl and start adding cucumbers and tomatoes until I think the dressing/produce ratio is right, so you might need more or less tomatoes and cucumbers.  I always like it to be heavy on the tomatoes. :)  

This makes for a great snack, side dish, or lunch if you want something quick and light.  


Saturday, September 1, 2012

vegetable soup

It might seem a little early for soup, as it's not even fall yet, but my fight with hay fever earlier this week left me feeling sickly and in the mood for soup.

Soup is one of my favorite things to make because you can use whatever you have on hand and it's all about approximates... a little of this and that until it looks and tastes right.  No two pots of soup are ever the same in our house.  So forgive my recipe if it needs altered - more liquid, seasoning.  I, of course, did not measure out everything when I made it, this is just to the best of my knowledge.  :)

beef vegetable soup

Ingredients:
4 c. chicken broth (will need to adjust depending on the amount of grain used)
1 can V8, or other vegetable juice
1 can diced tomatoes
4 c. chopped baby kale or fresh spinach
2 c. shredded beef or chicken
1 pepper, chopped
1 onion, chopped
1/2 - 1 c. farro or barley (depending on how hearty you want the soup)
1 c. chopped carrots
1 large handful of italian parsley, finely chopped
2-3 cloves minced garlic
2 bay leaves
2 tsp dried oregano or basil
1/2 tsp paprika
1/2 tsp garlic salt
freshly ground black pepper

Instructions:
Saute carrots, garlic, onion, and seasonings (including bay leaves) in 2-3 T. olive oil over medium heat for 3-5 minutes.  Add peppers and farro or barley and saute another 3-5 minutes or until peppers are a little tender and grain is lightly toasted.  Add parsley, canned tomatoes, V8 juice and chicken broth.  Cover and simmer for about 20 minutes, or until the grain is almost fully cooked, adding more broth or water if needed while the grain cooks. 
Add shredded beef or chicken (I had leftover italian beef I had made from a roast that I used), chopped kale, and more broth or water or salt if needed.  Cook until the kale is wilted and the grain is fully cooked.
Sprinkle with shredded parmesan cheese to serve, if desired.  This recipe should make 6-8 servings.

We ate our soup with garlic, parmesan multi-grain toasted bread that was good to dip in the broth (somehow it missed the picture).  Just spread a little butter or olive oil on slices of bread, sprinkle with garlic or onion powder and dried basil, then top with a little shredded parmesan.  Bake at 400 for about 5 minutes, or until golden brown.


Monday, August 27, 2012

ricotta veggie wraps

These wraps make for a nice light meal - with or without meat.  The original recipe doesn't have meat in it, but chicken is a good addition.  Sometimes I make them with meat and sometimes I don't, just depends on my mood and how much time I have!

veggie ricotta wraps

Ingredients:
Sauce:
1/3 c. sour cream or plain yogurt (if using plain yogurt add in 1/2 tsp. or more of sugar)
1/4 c. finely chopped chives
3 T milk
2 tsp. fresh lemon juice
2 tsp. basil pesto (optional)
1/4 tsp salt
pepper to taste

Filling:
2 c. chopped zucchini
1 1/4 c. chopped green beans (into ~1/2" pieces)
1 c. corn 
1 c. part-skim ricotta cheese
1/2 c. shredded mozzarella cheese
1/4 c. finely chopped chives
1/2 tsp. garlic salt
pepper to taste
+ shredded or cubed cooked chicken (optional)

4-6 whole wheat tortillas

Instructions:
Stir together sauce ingredients until smooth and set aside.

Saute zucchini, grean beans in 1 T. olive oil on medium heat for 3-5 minutes, then add in corn and cook another 2-3 minutes or until veggies are tender crisp.  Reduce heat to low and stir in chicken (if using) ricotta, mozzarella, chives, salt, and pepper.  Cook until cheese is melted, 1-2 more minutes.  You might have to use a little extra ricotta if using chicken, just make sure veggies and chicken are coated with cheese.

Fill warmed tortillas with veggie mixture, roll up, and serve with sauce on the top.  Sprinkle with more chives if desired.  It's good served with a little side salad to help lighten up the cheese.


Thursday, August 23, 2012

make-ahead lunch: curry chicken salad

I've been hearing from some friends lately that they want more healthy options of what to eat for lunch.  Something that they can make ahead of time that maybe lasts for a few day so they don't have to make something new everyday.  
If you're a foodie like me that loves to think about what they are going to eat for their next meal and the highlight of their day is eating lunch (and then dessert :))... you probably don't have a problem with making a tasty and fantastic lunch!  But I've learned that not everyone thinks ahead and dreams about food, so when lunch time rolls around, there might not be great options on hand.
So I'm going to start posting more lunch options... hopefully things that stay fresh and tasty for a few days (if you are the kind of person that's ok with leftovers!).  This first recipe for chicken salad is good for a couple days, but probably not too much more than that since there is avocado in it.  Of course you could always leave the avocado out and it might stay fresher longer.

curry chicken salad

Ingredients:
1/2 c. plain fat-free yogurt
1/4 c. mayo (I like the kind that's made with olive oil)
juice from 1/2 lemon
2 tsp fresh oregano (or 1/2 - 1 tsp dried)
1/2 tsp curry powder
1/4 tsp tumeric
1/4 tsp paprika
1/4 tsp celery salt (or garlic salt or regular salt)

2 chicken breasts - cooked and cut into cubes
1 avocado - cut into cubes
1/2 c. grapes - cut in half
1/3 c. chopped walnuts
2 T minced onion


Instructions:
Mix together the yogurt, mayo, lemon juice, and seasonings.  Add in the chicken, grapes, walnuts, and onions.  Stir until combined.  Add in the avocado last and stir just a little more until it's coated with sauce.  Season with more salt and freshly ground black pepper to taste.
Refrigerate for at least an hour before serving.  

Yield:  4-5 servings

Eat over lettuce, in a tortilla, or make a sandwich!

Monday, July 30, 2012

cucumber salad

Crispy.  Tangy.  Refreshing.  That's how I would describe this salad.  It's quick and easy, and I think it's almost better the second day, or after it's sat in the fridge for a while and all the flavors have blended, making it even more tasty.

sesame cucumber salad

Ingredients:
1 medium cucumber, thinly sliced
1/2 small onion, finely chopped
1/2 jalapeno, seeded and finely chopped
2 T chopped cilantro
1 T rice vinegar
2 tsp lime juice
1 tsp sesame oil
1 tsp canola oil
1 tsp sesame seeds
1/2 tsp agave nectar or sugar
salt & freshly ground black pepper

Method:
Make the dressing by combining the rice vinegar through the agave nectar.  Whisk until combined and set aside.  
Thinly slice the cucumbers with a mandoline.  Add chopped onion, jalapeno, and cilantro.  Pour dressing over cucumbers and stir to combine.  Add salt and pepper to taste.
Chill for at least 1 hour before serving.

Serves 3-4

* A modification of this recipe.

Thursday, July 12, 2012

quinoa patties

I found this recipe on pinterest and decided it would be a fun new way to eat quinoa.  With just a few modifications and a quick beet salad to go with the patties, we had ourselves a simple and yummy meal.  I will say that these were definitely best right after they were made and were just ok as leftovers.


quinoa patties with beet salad

Quinoa patties:
3 c. cooked quinoa (1 c. dry)
3 eggs
3/4 c. breadcrumbs
1/2 c. shredded parmesan cheese
1/4 c. chopped basil
2 T chopped parsley
1/2 tsp garlic salt
1/2 tsp onion powder
1/4 tsp paprika
fresh ground black pepper

Combine all ingredients and stir until mixed.  Heat 2 T canola oil in saute pan at medium heat.  Once hot, place large spoonfuls of quinoa in oil (oil should sizzle).  I didn't worry about molding the quinoa mixture in my hands at all before putting it in the pan, just pressed the spoonful of quinoa into a 2" round patty.  If your oil is hot and it starts cooking right away, it will keep the patty together.
Cook for about 2-3 minutes on each side, or until golden brown.  Remove and place on a plate covered with paper towel to absorb extra oil.  Sprinkle with more shredded parmesan cheese and a little more salt & freshly ground black pepper. 
Add more oil to the pan and cook more patties, until quinoa mixture is gone.
Makes about 15 patties.  Since they're small, I would figure 3-4/person.

Beet salad:
1 c. chopped beets (can either roast yourself, or just go with the canned version :)) *
1/2 c. corn
drizzle of olive oil
drizzle of balsamic vinegar
salt & pepper

To serve, place a few patties over a bed of spinach or arugula and top with beet salad and a little chopped basil.  Drizzle with a little more olive oil or balsamic vinegar if desired.

* if beets aren't your thing, tomatoes would be a good substitute

Tuesday, July 10, 2012

comfort food

So I'm not one that's big on comfort foods - secret's out (or maybe that never was a secret).  I like things fresh and light for the most part, but there are few comfort dishes I remember as childhood favorites that still have a special place in my heart... one of those being layered taco casserole.  Not sure if that's the real name of it, but that's what I call it.  Although I don't love the thought of calling anything I eat a casserole.  It just has a negative connotation in my mind and brings thoughts of a pile of food that's too cheesy, buttery, and gooey to be healthy or delicious.  
But this casserole is different.  Taco shells layered with meat, veggies, and cheeses bakes into one big pile of mexican goodness.  It's not the prettiest meal, but it's tasty.
Now this recipe isn't picky and there's not real science or exact amounts to it.  You can make the layers as simple (taco meat and cheese), or as complex as you like.  You could also make it a no-meat meal and use only black beans and veggies.  I tend to use whatever I have on hand and use up as many things in my fridge as possible!  And if have extra of the meat/veggie filling, you can just save it in the fridge or freezer for another mexican dish (like tortilla soup... one of the few good things about winter).          

taco casserole

Filling:
1/2 lb. cooked meat (ground beef or pork, chicken)
1 zucchini, cut into small pieces
1 small onion, diced
1 can diced tomatoes
1 can diced green chilies
1/2 can black beans, drained and rinsed
1/2 c. corn
1/2 c. salsa
1/4 c. chopped cilantro
2 tsp cumin
1 tsp chili powder
1 tsp paprika
1 tsp garlic powder
1/2 tsp cayenne powder (optional)

Saute the onion with a little olive oil for 2-3 minutes.  Add zucchini and seasonings (cumin through cayenne) and cook a few more minutes until zucchini softens a little but is still firm.  Add remaining ingredients (including meat) and simmer for 3-5 minutes.  Add more seasonings or salt if needed.

Pour a little salsa in the bottom of a baking dish so the tortillas do not stick.  Add a flour tortilla* and cover with about 1/2 c. of the filling (I just do a thin layer) and sprinkle with a handful of shredded cheddar cheese.  Keep layering tortillas and filling until your baking dish is full (I usually use a little more cheese on the last layer).  I believe I can usually get about 6 tortillas in a tall round baking dish.  

Bake at 375 for 20-30 minutes or until the edges are browned and the cheese is melted.  Serve with toppings - sour cream, guacamole, taco sauce, salsa, cilantro, lettuce...
Serves 6-8.

* this is also good with corn tortillas, just bake in a smaller dish


Thursday, July 5, 2012

crostini

Dinner last night... kebabs (a summer favorite!), corn on the cob (it was the 4th, afterall), and a tasty variety of crostini.  I had made roasted grapes last week to go over tilapia (which was a new creation and very good - the sweetness of the grapes paired well with the tilapia), and also had sundried tomato jam leftover in the fridge, making these crostini pretty easy to make.  If you had to start from scratch and make the roasted grapes or other toppings, you could go with just one kind to keep things simple.  Multiple kinds would be a good option for hosting...

roasted grape, tomato.basil, and sundried tomato.onion crostini

Roasted grape crostini:
grapes (as many as you'd like)
olive oil
salt & pepper
goat cheese
multi-grain baguette

Drizzle grapes with olive oil and sprinkle with salt and pepper.  Roast at 400 for 10-15 minutes until they have started to "pop" and are tender and juicy.
Bake thin slices of a multi-grain bageutte at 400 (could bake while the grapes are roasting) for about 10 minutes, or until just starting to turn golden brown.  Top with roasted grapes and crumbled goat cheese.  Bake for another 3-5 minutes until goat cheese has softened. 

Basil tomato crostini:
2 roma tomatoes, diced
1 T basil pesto
1 clove minced garlic
drizzle of balsamic vinegar (about 1-2 tsp)
shredded or grated parmesan cheese
multi-grain baguette
*this was enough tomatoes for 4-5 slices of bread

 Top thin slices of a multi-grain bageutte with parmesan cheese and bake at 400 for 10-15 minutes until crispy and golden brown.  While the bread bakes, combine diced tomatoes with pesto, garlic and vinegar.  Once the bread has baked, top with tomatoes and enjoy!

Sundried tomato crostini:
sundried tomato jam **
goat cheese
multi-grain baguette

Bake thin slices of a multi-grain bageutte at 400 for about 10 minutes, or until just starting to turn golden brown.  Top with sundried tomato jam and crumbled goat cheese.  Bake for another 3-5 minutes until goat cheese has softened. 

** recipe here - my modifications were 1/2 the sugar, spicy oregano instead of thyme (thyme is good too, just didn't have any), no extra olive oil (just used the oil from the sundried tomatoes) and a handful of pine nuts after it was done cooking.  You can also use all water if you do not have chicken broth on hand.

Thursday, June 28, 2012

product review

I snagged this carton of Silk coconut milk when I found it very on sale at Target (hence the red sticker).  I'd never had it before but it sounded fun to try.


And it was great!  It does have some added sugars and quite a bit of saturated fat due to the coconut milk, but it was a fun and tasty addition to lots of things.  It gave a hint of coconut flavor, not overwhelming or too sweet.  Beck even loved it and said "mmmm" when he drank it. :)  Some of the ways I used it: 
  • in my cereal (I mixed it with regular milk)
  • homemade coconut pudding - topped with shredded coconut of course
  • in raw oatmeal (like cereal)
  • poured over fruit crisp (recipe in previous post)
  • in greek yogurt (I like to thin it out... it's a little too thick for my likings)
Obviously there are endless ways to use it.  Had my ice-cream machine not konked out on me, I would have likely made coconut ice-cream with it... which sounds so good.  So yes, I recommend picking up a carton and trying it out! 

Wednesday, June 27, 2012

fruit crisp

Sometimes you just need to have a good dessert after dinner.  Last night was one of those nights.  The peaches and apricots that were past their prime were calling to be eaten, so fruit crisp it was!  I like my fruit crisp with a lot of fruit and a little topping, so that's how this one turned out.  You could make more topping if that's how you like it. 


Fruit:
4 peaches, sliced (I didn't peel mine)
2 apricots, sliced (or just use another peach or other fruit)
1/4 c. chopped dried plums, or other dried fruit
juice from 1/2 a lemon - about 2 T
2 T honey
1 T agave nectar
1 tsp vanilla
1/2 tsp cinnamon
1/4 tsp ginger

Combine all ingredients and put in an 8x8 pan or other small baking dish. 

Topping: 
1 c. oats
1/3 c. walnuts, chopped
2 T whole wheat flour
2 T chia seeds (optional)
2 T brown sugar
2 T chilled butter
1 T canola oil
1/2 tsp cinnamon
1/4 tsp salt

Combine all ingredients except for butter and oil.  Cut chilled butter into small pieces and cut into dry ingredients with a fork, pastry mixer, or your fingers (the best way :) ) until mixture is crumbly.  Add oil and stir until combined.  Add more oil if mixture is still too dry.
Spread topping over fruit and bake at 375 for 20-30 minutes or until bubbly and top is golden brown.  Serve with ice-cream and coconut (if you like it.. I didn't take time to toast mine, but that would be good).  Serves 6-8 people.

side note:  The version I made wasn't any extra sweet, so if you like it really sweet, add more honey or agave nectar (or sugar).

Monday, June 25, 2012

kale pesto

I saw a recipe somewhere for kale pesto, so when I grabbed a huge bag of kale from Costco, I decided to try it out.  
I love basil, so I usually make basil pesto, but this was a nice change... more of a "tangy" flavor and not quite as rich tasting as basil pesto. 
Mine ended up on a pizza, with roasted grape tomatoes, pine nuts and parmesan... very good.  However, it would be good on pasta, a sandwich... anything you would do with basil pesto. 


kale pesto

Recipe: (all in generic measurements)
several handfuls of raw kale, around 2-3 c. (the bag I bought was little baby kale leaves, but if you buy big leaves, remove the tough centers and chop it up)
2 cloves garlic
a generous drizzle of olive oil
a handful of pine nuts
a handful of parmesan cheese
juice from 1/2 a lemon
salt & pepper to taste

Place all ingredients in a food processor and blend until smooth.  Keep adding a little more of everything until the flavor and consistency is just right.  
I had to start with 1 or 2 cups of kale and then add more after that had blended, since my food processor isn't large enough to hold all of the kale at once... you might need to do the same.    

Thursday, June 21, 2012

polenta

Polenta is one of those things that I wasn't afraid to try, just never got around to making it... maybe a little worried that it would just be plain and boring?  I had randomly grabbed one of those packaged logs if polenta at Trader Joe's several months ago and then it just sat in the pantry after that.  After seeing a recipe similar to the one I made in a magazine at the dentist's office, (during a visit that turned out to be not so fun.  I found out that I have a cavity!  my first one!  my pride was shattered, as I thought I would forever be able to brag that I didn't have any cavities :) ) I was inspired to finally make that the night we tried polenta for the first time.  

And it exceeded my expectations!  It was even good plain, without the tomato sauce and just a little salt and olive oil after it was cooked.  I will make it again, in a some new way.  Any recommendations?


polenta rounds with tomato basil sauce


Polenta:
1 log of polenta (or you could figure out to make it the hard way using instant polenta :) )
olive oil
salt

You can make the polenta a variety of ways - bake it in the oven, cook it in a skillet, etc... I chose to cook it on a grill pan over the stove.  If using a grill pan, place the grill pan on the stove and turn the two burners it covers onto medium heat.  Drizzle the pan with a little olive oil.
Cut the log of polenta into ~1/2" slices.  I think I got 9 or 10 slices out of one log.  Once the grill pan is hot (it will sizzle when you put the polenta on the pan if it's ready), put on the polenta and sprinkle slices with salt.  Cook on each side for 3-5 minutes, or until each side is golden and you can see the lines from the grill pan.

Tomato sauce:
4 roma tomatoes, seeds removed & cut into small pieces 
1/3 - 1/2 c. spaghetti sauce (I used up a jar of roasted tomato & garlic)
2 cloves minced garlic
large handful of fresh basil, chopped
olive oil
salt & pepper to taste

Combine roma tomatoes and garlic with a drizzle of olive oil in a sauce pan.  Cook for just a minute or two minutes to warm tomatoes.  Add spaghetti sauce, basil and salt & pepper.  Cook another couple minutes to warm spaghetti sauce.  Tomatoes should be warm and tender but not mushy.  And it should taste very fresh and delicious!


Thursday, June 14, 2012

couscous salad

I realized that I've been posting lots of salad recipes lately... must be summer time. :)  This is an easy couscous salad to throw together for lunch or to take to a summer cookout.  The veggies can be changed for whatever you have on hand - peppers, zuchinni, carrots, asparagus, corn, edamame, etc.  I made a cob style version of this salad that had bacon, corn, tomatoes, edamame, walnuts, and blue cheese that went over well at a cookout.

greek couscous salad

Salad:
2 c. Israeli couscous
1/2 can black olives, halved
1/2 c. grape tomatoes, halved
1 1/2 c. arugula, finely chopped
2 c. blanched green beans (long ones cut in half)
1/4 c. fresh basil, finely chopped
8 sundried tomatoes, finely chopped
3 green onions, chopped 
4 oz. crumbled feta cheese
handful of pine nuts

Bring 2 1/4 c. water to a boil.  Add couscous and simmer until cousous is al dente, about 8 minutes.  While the couscous cooks, blanch the green beans by bringing some water to a boil (enough to cover the green beans), then adding the green beans and cooking until tender crisp, 3-5 minutes.  Drain the beans and place them in a bowl of ice water to keep them crisp.  Once the couscous is done, drain that as well and rinse with cold water to keep it from sticking together.  Combine couscous, green beans and remaining ingredients in a large mixing bowl.

Dressing:
2 T. sugar
3 T. red or white wine vinegar
3 T. canola oil
2 cloves minced garlic
1/2 tsp celery salt
1/2 tsp garlic salt
1/2 tsp paprika
1/2 tsp ground mustard
1 tsp dried oregano
freshly ground black pepper

Combine all ingredients and whisk until smooth.  Pour over salad and stir until mixed in.  Add more olive oil if salad needs more moisture.


Saturday, June 9, 2012

asian salad

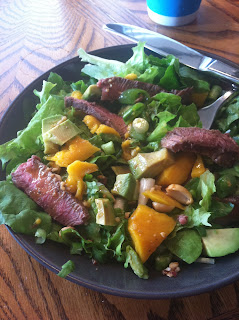
This recipe was passed along to me from my aunt, who found it quite tasty... and I had to agree with her.  I love asian food and salads, so this was a perfect combination.  The salad dressing is super good and what really makes the salad.  The original recipe's salad toppings were steak, grilled asparagus, red onions, mango, and daikon or radish sprouts, but I didn't have several of those ingredients, so I made my own combination, of course.

steak salad with hoisin vinaigrette

Steak (and asparagus if using):
1/2 tsp ground black pepper
1 tsp coriander
1 tsp salt
1 lb. steak (called for New York strip, but can use other kinds)
 1 1/2 T. olive oil
1 lb. asparagus

Coat the steak with 1/2 T. of olive oil and spices and set aside for 30 minutes or up to 1 1/2 hours.  Toss the asparagus with the remaining 1 T. olive oil and season with salt & pepper; set aside until ready to grill.
Grill the steaks until grill marks form, or about 5 minutes, then flip and grill about 4 more minutes (steak will be about medium).  Let rest on a cutting board and tent with foil to keep warm while the asparagus grills.
Spread the asparagus on the grill (or on a grill pan) and cook about 5 minutes or until tender crisp, turning a couple times while they cook.

Vinaigrette:
3 T. chicken broth or water
2 1/2 T. hoisin sauce
2 T. olive oil
2 T. white or red wine vinegar
1 1/2 tsp low sodium soy sauce
2 tsp minced fresh ginger
1 tsp dijon or chinese mustard
1 tsp minced garlic
salt & freshly ground pepper to taste

Combine all ingredients and mix in a blender or with a whisk until smooth.

Salad:
4 - 6 c. watercress or mixed greens
1 large mango cut into thin wedges
1 avocado cut into thin wedges
1/2 c. edamame
1/2 small red onion thinly sliced or green onions
1/4 c. chopped cilantro
handful of chopped peanuts
Daikon, radish, or pea sprouts 

Arrange cress or mixed greens in bowl and top with steak, asparagus, mango, avocado, edamame, and onions.  Drizzle with vinaigrette and sprinkle with peanuts, cilantro and sprouts.


Thursday, June 7, 2012

asparagus pizza

Yum. Yum. Yum.  I Loved this pizza, and so did my 1 1/2 year old son, but not my husband, so I guess it's not for everyone!

grilled asparagus pizza with goat cheese and pine nuts

If using homemade pizza crust, roll into a thin crust and bake at 400 for 10-15 minutes, or until golden brown and crispy.  

While the pizza crust bakes, grill the asparagus.  Once grilled, chop up into 1 inch pieces and drizzle with balsamic vinegar.    

Once the crust is done baking, brush with olive oil and 2-3 cloves minced garlic.  Top with grilled asparagus, pine nuts and goat cheese.  The pizza doesn't need to bake any longer, unless you want to soften the goat cheese.  To soften the cheese, bake just a few minutes on 400.

Recipe for homemade pizza crust:
1 c. lukewarm water
1 package yeast
1 tsp salt
1 T honey
2 1/2 - 3 c. wheat flour
2 T ground flax seed
1/4 c. cornmeal

Pour 1 c. lukewarm water over yeast in a large mixing bowl and let sit for about 5 minutes, or until the yeast starts to react and bubble up.  Add remaining ingredients and mix until dough is soft and elastic.  I start with 2 c. flour and add more until the dough is no longer sticky and can be handled.  If you make dough in a mixer or bread machine, it kneeds the dough for you, so no extra kneeding is needed at this point.
Place ball of dough in a large bowl, coated with cooking spray or olive oil and brush the top of the dough with a little olive oil.  Cover with a towel let rise until dough has doubled in size, for about 30-45 minutes.  I can get 2 thin pizza crusts from this recipe.